Install Kubernetes cluster in Virtual Machines the easy way

In this post, we will see how to install a Kubernetes v1.18 cluster composed of 2 VMs running Ubuntu 20.04 in few minutes.
We will use provisioning scripts to install and configure the master and the worker nodes.
The provision script changes hostname to the IP of the machine (to make sure it is unique to match k8s requirements) and set the swap off then fix the IP address of the machine.
Then it installs the correct version of docker that matches Kubernetes 1.18 and install it as a service, then install version 1.18 fromkubeadmin, kubectl and kubelet.
And in case of the master node, it initializes the kubeadm and installs flannel network.
We will go install Kubernetes cluster in 4 steps:
- Create the provision script for the master node
- Create and Provision the master node
- Create the Provision script for the worker node
- Create and Provision the worker node
- Testing the cluster
We will use vermin so we can complete the cluster installation in minutes.
Vermin is a smart, simple and powerful command line tool for Linux, Windows and macOS. It’s designed for developers who want a fresh VM environment with a single command. It uses VirtualBox to run the VM. Vermin will fetch images in your behave.
To follow this tutorial, you will have to install vermin.
First, you need to install Virtualbox, then for Linux and macOS, type in a terminal window:
/bin/bash -c "$(curl -fsSL https://raw.githubusercontent.com/mhewedy/vermin/master/install.sh)"And for Windows, Open a PowerShell terminal as an administrator then type:
iex ((New-Object System.Net.WebClient).DownloadString('https://raw.githubusercontent.com/mhewedy/vermin/master/install.ps1'))vermin is a single binary, you can still download it yourself and do a manual installation or even build it from source, see Github page for more information.
Step 1: Create the provision script for the master node
let’s create the provision script that will do the setup for the master node. Let’s name the file master.sh.
You can find the script on GitHub as well.
Step 2: Create and Provision the master node
Now open a new terminal and run the following command, note the Kubernetes master need 2 CPUs and 2048 MB memory to run correctly:
$ vermin create ubuntu/focal64 --cpus 2 --mem 2048 /path/to/master.sh✔ Creating vm_01 from image ubuntu/focal64
✔ Setting bridged network adapter
✔ Starting vm_01
✔ Establishing connection
Provisioning vm_01
++ docker_ubuntu_release=bionic
++ k8s_version=1.18.0
......
......
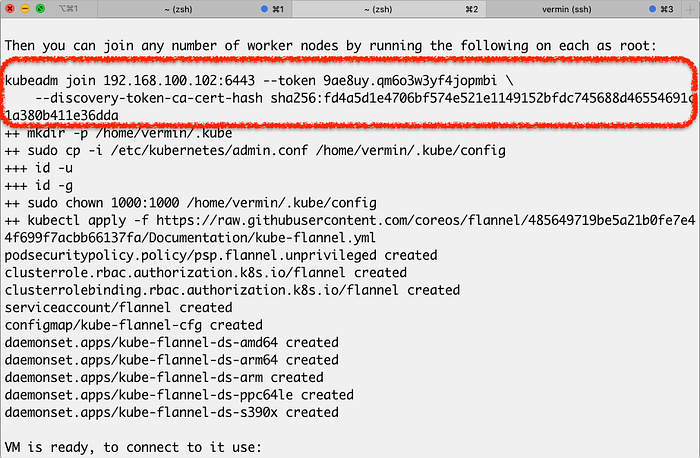
Then you can join any number of worker nodes by running the following on each as root:kubeadm join 192.168.100.102:6443 --token <token...> \
--discovery-token-ca-cert-hash sha256:<hash....>
......
VM is ready, to connect to it use:
$ vermin ssh vm_01
Now the master is installed, configure, and ready. It took about 4 minutes in my case to finish the setup.
You need to copy the command printed from the output of the vermin create command above (started by kubeadmin join) to use it from the worker nodes to join the cluster as shown below:
We have the master node installed and ready, let create and provision the worker node.
Step 3: Create the Provision script for the worker node
let’s create the provision script that will do the setup for the worker node. Let’s name the file worker.sh.
You can find the script on GitHub as well.
Step 4: Create and Provision the worker node
Now open a new terminal and run the following command, note the Kubernetes worker need 1 CPUs and 2048 MB memory to run correctly:
$ vermin create ubuntu/focal64 --cpus 1 --mem 2048 /path/to/worker.sh✔ Creating vm_02 from image ubuntu/focal64
✔ Setting bridged network adapter
✔ Starting vm_02
✔ Establishing connection
Provisioning vm_02
++ docker_ubuntu_release=bionic
++ k8s_version=1.18.0
......
......

VM is ready, to connect to it use:
$ vermin ssh vm_02
Now the worker is installed, configured, and ready. It took about 3 minutes in my case to finish the setup.
Now let’s make the worker join the cluster. (note vm_01 is the master and vm_02 is the worker)
Let's execute the join command against the worker node:
$ vermin exec vm_02 -- sudo kubeadm join 192.168.100.102:6443 --token <token> --discovery-token-ca-cert-hash sha256:<hash>
You can repeat steps 3 and 4 above as many times as you would to create worker nodes.
🚀🚀🚀
Testing the cluster
The cluster setup has been completed and ready to be used. let’s login to the master node and test the cluster:
$ vermin ssh vm_01Now we inside the master node, let’s check the available nodes: (the role <none> means worker nodes)
vermin@192.168.100.102:~ $ kubectl get nodes
NAME             STATUS   ROLES    AGE     VERSION
192.168.100.102   Ready    master   16m     v1.18.0
192.168.100.103   Ready    <none>   5m26s   v1.18.0
Let’s create a pod and test it is working:
vermin@192.168.100.102:~ $ kubectl run nginx --image=nginx
pod/nginx created
vermin@192.168.100.102:~ $ kubectl expose pod nginx --port=80
service/nginx exposed
Let’s check it is running by creating another pod and try to curl the Nginx service.
vermin@192.168.100.102:~ $ kubectl run curlpod --image radial/busyboxplus:curl --restart=Never -it --rm -- curl nginx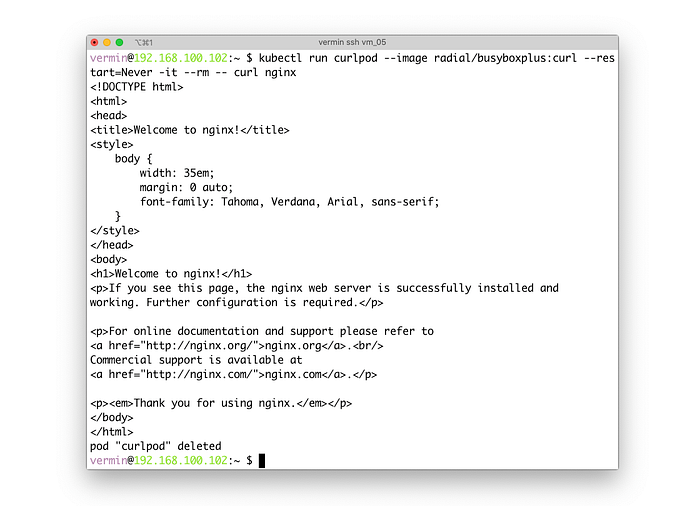
This post installs flannel for Networking, which does not support Network Policies.
To work with Network Policies you need to install Calico along with flannel (a.ka. Canal ).
More information can be found here: https://docs.projectcalico.org/getting-started/kubernetes/flannel/flannel
Bouns
vermin allow you to tag VMs and filter by tag, name, and image when listing the VMs.
This will be useful when you have multiple VMs, so to list VMs we will get output similar to:
$ vermin ps
VM NAME    IMAGE              CPUS    MEM       DISK     TAGS
vm_01      ubuntu/focal64       2       2048      5.7GB
vm_02      ubuntu/focal64       1       2048      3.8GB
vm_03      ubuntu/focal64       1       1024      5.2GB
Now vm_01 and vm_02 are the Kubernetes master and worker, and vm_03 for another purpose. Now we can tag vm_01 and vm_03 and list only such VMs:
$ vermin tag vm_01 k8s-master
$ vermin tag vm_02 k8s-worker
Then when listing, pass a filter where tags field contains k8s
$ vermin ps -f tags=k8s
VM NAME    IMAGE              CPUS    MEM       DISK     TAGS
vm_01      ubuntu/focal64       2       2048      5.7GB    k8s-master
vm_02      ubuntu/focal64       1       2048      3.8GB    k8s-worker
The filter function follows docker filter in which you can filter with multiple fields and the filter will be matched contains , and the result should match all filters supplied.
References: